Protezione di un'applicazione a pagina singola (SPA) - Integrazione avanzata
Questo articolo illustra un approccio per integrare CrowdHandler in un'applicazione a pagina singola (SPA) al fine di proteggerla da un traffico eccessivo e garantire un'esperienza utente fluida. L'integrazione si articola in due componenti principali:
-
Integrazione JavaScript di CrowdHandler con modalità SPA abilitata.
-
Un'integrazione personalizzata lato server che protegge l'API (o le API) su cui si basa la tua SPA.
Il ruolo dell'integrazione JavaScript è quello di fungere da primo e principale livello di protezione, con il compito di verificare le richieste degli utenti, gestire lo stato delle promozioni all'interno del browser e, se necessario, reindirizzare gli utenti alla sala d'attesa.
Il ruolo dell'integrazione lato server è quello di fungere da secondo livello di protezione, a difesa da chiunque sia abbastanza esperto da aggirare l'integrazione JavaScript, oltre ad essere responsabile della trasmissione delle informazioni sulle prestazioni a CrowdHandler.
Installazione dell'integrazione JavaScript
Il primo passo consiste nell'installare la nostra integrazione JavaScript con la modalità SPA abilitata
Per impostazione predefinita, i controlli di CrowdHandler vengono eseguiti solo in caso di ricaricamento completo del DOM, ovvero quando il browser viene aggiornato in modo forzato o quando una pagina viene recuperata per la prima volta dal server web prima del download del bundle dell'applicazione. Nelle applicazioni SPA ciò comporta che gli utenti risultino "invisibili" a CrowdHandler dopo la loro prima visita.
La modalità SPA risolve questo problema attivando una funzionalità aggiuntiva che fa sì che i controlli di CrowdHandler vengano eseguiti ogni volta che l'URL cambia, indipendentemente dal fatto che si sia verificato o meno un ricaricamento del DOM. Ciò è possibile monitorando lo stato dell'URL e utilizzando un listener di eventi per forzare un controllo di CrowdHandler ogni volta che viene rilevata una modifica.
Proteggere le proprie API
Il modo specifico in cui proteggi la tua API con CrowdHandler dipende dal linguaggio o dal framework che utilizzi, il che rende impossibile trattare tutti gli scenari in questa guida. Alcuni esempi specifici di implementazione per gli ambienti NodeJS e Lambda@Edge (CloudFront) sono riportati nei link alla fine dell'articolo.
1. Aggiungi ulteriori campi ai payload delle tue richieste API.
Ai fini di questo esempio, supponiamo che tu stia gestendo una SPA di e-commerce. Esiste un'unica API, sotto il tuo controllo, che viene chiamata per recuperare i dati.
Partiremo dai seguenti presupposti, ma i nostri esempi possono essere facilmente adattati alle vostre esigenze:
- I payload vengono inviati utilizzando il tipo di contenuto application/json.
- Ti interessa solo proteggere i metodi PUT e POST. Ciò copre in genere operazioni quali l’aggiunta al carrello e il checkout, il che è sufficiente per impedire a chi aggira l’integrazione JavaScript di completare percorsi end-to-end. *
* Nulla ti impedisce di proteggere tutte le chiamate API e tutti i tipi di metodo di richiesta; questa soluzione potrebbe essere opportuna se temi che malintenzionati prendano di mira, ad esempio, percorsi API soggetti a carichi intensi che rispondono ai metodi GET. Dovrai aggiungere ed estrarre i campi aggiuntivi come parametri della stringa di query.
Campi
Chiave: sourceURL
Valore: location.href (o equivalente)
Chiave: chToken
Valore: memoria locale token CrowdHandler *
* Ecco una semplice funzione di esempio che estrae il token CrowdHandler dalla memoria locale. Sostituisci my.domain.com con il dominio del tuo sito e invia stringhe vuote "" se non viene trovato alcun token. Questo è importante perché comunica al codice lato server che deve essere assegnata una nuova sessione CrowdHandler.
//Storage format
'{"countdown":{},"positions":{},"token":{"my.domain.com":"tok0N53DjDMpWeid"}}'
try {
  let ch_storage = JSON.parse(localStorage.getItem("crowdhandler"))
  return ch_storage.token["my.domain.com"]
} catch (error) {
  return ""
}
2. Installare il codice lato server
Lo scopo del codice lato server è quello di fungere da filtro per l'API e verificare, tramite CrowdHandler, lo stato di promozione delle richieste. Le chiamate API che non presentano una sessione CrowdHandler promossa devono essere bloccate immediatamente.
Il valore sourceURL fornito nei payload dell’API viene utilizzato come URL temporaneo durante il check-in con CrowdHandler. Nel pannello di controllo, avrai configurato CrowdHandler per proteggere gli URL del tuo sito web, non quelli dell’API. Questa riscrittura temporanea che utilizza il valore sourceURL indica a CrowdHandler la pagina da cui ha avuto origine la chiamata API.
Il token CrowdHandler viene estratto dal valore chToken fornito nei payload dell'API.
Per ulteriori dettagli sull’implementazione, consultare i commenti nel codice.
Esempio - Express Framework

const express = require("express");
const router = express.Router();
const crowdhandler = require("crowdhandler-sdk");
const { URL } = require("url");

// Middleware to handle CrowdHandler logic for POST and PUT methods
const crowdHandlerMiddleware = async (req, res, next) => {
  const method = req.method;

  // Check if the request method is POST or PUT
  if (method === "POST" || method === "PUT") {
    const publicKey = "YOUR_PUBLIC_KEY";
    const public_client = new crowdhandler.PublicClient(publicKey);
    const ch_context = new crowdhandler.RequestContext({request: req, response: res});
    const ch_gatekeeper = new crowdhandler.Gatekeeper(
      public_client,
      ch_context,
      { publicKey: publicKey }
    );

    let decodedBody;
    let chToken;
    let sourceURL;

    if (req.body) {
      try {
        decodedBody = JSON.parse(req.body);
        chToken = decodedBody.chToken;
        sourceURL = decodedBody.sourceURL;

        // Extract host & path from sourceURL
        let url = new URL(sourceURL);
        let temporaryHost = url.host;
        let temporaryPath = url.pathname;

        // Override the gatekeeper host and path with the sourceURL
        ch_gatekeeper.overrideHost(temporaryHost);
        ch_gatekeeper.overridePath(temporaryPath);

        // If there's a token in the body, provide gatekeeper with a pseudo cookie
        if (chToken) {
          ch_gatekeeper.overrideCookie(`crowdhandler=${chToken}`);
        }
      } catch (error) {
        console.error("Error parsing JSON:", error);
        return next(error);
      }
    }

    const ch_status = await ch_gatekeeper.validateRequest();

    // If the request is not promoted, send a 403 Forbidden response and do not proceed to the next middleware
    if (!ch_status.promoted) {
      res.status(403).send("Forbidden");
      return;
    } else {
      // If the request is promoted, save the ch_gatekeeper instance in res.locals for later use
      res.locals.ch_gatekeeper = ch_gatekeeper;
    }
  }
  // Continue to the next middleware or route handler
  next();
};

// Add the CrowdHandler middleware to the router
router.use(crowdHandlerMiddleware);

// Route handler for all request methods and paths
router.all("*", (req, res, next) => {
  // Render the view and send the HTML
  res.render("index", { title: "hello" }, (err, html) => {
    // Handle any errors during rendering
    if (err) {
      return next(err);
    }

    // Send the rendered HTML to the client
    res.send(html);

    // If the ch_gatekeeper instance exists in res.locals, record the performance
    if (res.locals.ch_gatekeeper) {
      res.locals.ch_gatekeeper.recordPerformance();
    }

    /*
     * IMPORTANT CONSIDERATION:
     *
     * The default status code sent to CrowdHandler is '200'. However, if a different status code needs to be sent,
     * it can be achieved by passing it as a parameter to the 'recordPerformance' method.
     *
     * Example:
     * chGatekeeper.recordPerformance({status: 404});
     *
     * If you are using CrowdHandler's autotune feature, it is crucial to pass accurate status codes to CrowdHandler to ensure the precision of analytics and autotune results.
     */
  });
});

// Export the router
module.exports = router;
Esempio - Lambda@Edge
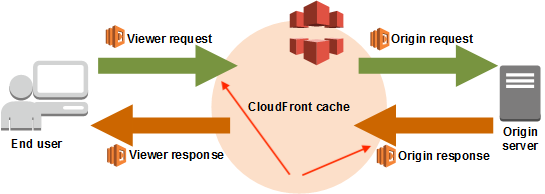
Richiesta di un utente
"use strict";
//include crowdhandler-sdk
const crowdhandler = require("crowdhandler-sdk");
const publicKey = "YOUR_PUBLIC_KEY_HERE";

let ch_client = new crowdhandler.PublicClient(publicKey, { timeout: 2000 });

module.exports.viewerRequest = async (event) => {
  //extract the request from the event
  let request = event.Records[0].cf.request;
  let decodedBody;
  let chToken;
  let sourceURL;

  //if the request is not a POST or PUT request, return the request unmodified
  if (request.method !== "POST" || request.method !== "PUT" ) {
    return request;
  }

  if (request.body && request.body.encoding === "base64") {
    // Decode the base64 encoded body
    decodedBody = Buffer.from(request.body.data, "base64").toString("utf8");

    // Parse the JSON encoded body
    try {
      // Parse the decoded body into a JSON object
      decodedBody = JSON.parse(decodedBody);
      //destructure sourceURL, chToken from the decoded body
      chToken = decodedBody.chToken;
      sourceURL = decodedBody.sourceURL;

      // Now you can work with the JSON object
    } catch (error) {
      console.error("Error parsing JSON:", error);

      // Handle the error or return the request object unmodified
      return request;
    }
  }

  //extract host & path from sourceURL using URL API
  let url = new URL(sourceURL);
  let temporaryHost = url.host;
  let temporaryPath = url.pathname;

  //Filter the event through the Request Context class
  let ch_context = new crowdhandler.RequestContext({ lambdaEvent: event });
  //Instantiate the Gatekeeper class
  let ch_gatekeeper = new crowdhandler.Gatekeeper(
    ch_client,
    ch_context,
    {
      publicKey: publicKey,
    },
    { debug: true }
  );

  //Override the gatekeeper host with the sourceURL
  ch_gatekeeper.overrideHost(temporaryHost);
  //Override the gatekeeper path with the sourceURL
  ch_gatekeeper.overridePath(temporaryPath);

  //If there's a token in the body provide gatekeeper with a pseudo cookie so that it can check that the provided token is valid/promoted
  if (chToken) {
    ch_gatekeeper.overrideCookie(`crowdhandler=${chToken}`);
  }

  //Validate the request
  let ch_status = await ch_gatekeeper.validateRequest();

  //If the request is not promoted, reject the request
  if (!ch_status.promoted) {
    return {
      status: "403",
      statusDescription: "Forbidden",
      headers: {
        "content-type": [
          {
            key: "Content-Type",
            value: "text/plain",
          },
        ],
        "cache-control": [
          {
            key: "Cache-Control",
            value: "max-age=0",
          },
        ],
      },
      body: "Access to this resource is forbidden.",
    };
  }

  //If the request is promoted, allow it to proceed normally
  //set customer headers for recording performance on the request before passing it through
  request.headers["x-crowdhandler-responseID"] = [
    { key: "x-crowdhandler-responseID", value: `${ch_status.responseID}` },
  ];
  request.headers["x-crowdhandler-startTime"] = [
    { key: "x-crowdhandler-startTime", value: `${Date.now()}` },
  ];

  //return the request
  return request;
};
Risposta di Origin
const crowdhandler = require("crowdhandler-sdk");
const publicKey = "YOUR_PUBLIC_KEY_HERE";

let ch_client = new crowdhandler.PublicClient(publicKey, { timeout: 2000 });

module.exports.originResponse = async (event) => {
  let request = event.Records[0].cf.request;
  let requestHeaders = event.Records[0].cf.request.headers;
  let response = event.Records[0].cf.response;
  let responseStatus = response.status;

  //convert response status to number
  responseStatus = parseInt(responseStatus);

  //extract the custom headers that we passed through from the viewerRequest event
  let responseID;
  let startTime;

  try {
    responseID = requestHeaders["x-crowdhandler-responseid"][0].value;
  } catch (e) {}

  try {
    startTime = requestHeaders["x-crowdhandler-starttime"][0].value;
  } catch (e) {}

  //Work out how long we spent processing at the origin
  let elapsed = Date.now() - startTime;

  let ch_context = new crowdhandler.RequestContext({ lambdaEvent: event });

  //Instantiate the Gatekeeper class
  let ch_gatekeeper = new crowdhandler.Gatekeeper(
    ch_client,
    ch_context,
    {
      publicKey: publicKey,
    },
    { debug: true }
  );

  //If we don't have a responseID or a startTime, we can't record the performance
  if (!responseID || !startTime) {
    return response;
  }

  //This is a throw away request. We don't need to wait for a response.
  await ch_gatekeeper.recordPerformance({
    overrideElapsed: elapsed,
    responseID: responseID,
    sample: 1,
    statusCode: responseStatus,
  });

  //Fin
  return response;
};
3. Andando oltre...
Gli esempi riportati sopra rappresentano soluzioni relativamente semplici per bloccare l'accesso alla tua API da parte degli utenti che CrowdHandler considera non autorizzati.
Se vuoi andare incontro alle esigenze degli utenti che accedono direttamente alle tue API o sei preoccupato per i casi limite, puoi modificare il codice di esempio in modo che restituisca una risposta JSON contenente un URL della sala d'attesa completo. Consulta la nostra documentazione sull'SDK JS per capire come ottenere questo URL.
Una volta ottenuto l’URL completo della sala d’attesa, potresti inserirlo nella risposta e far sì che il codice lato client sostituisca l’URL corrente con quello della sala d’attesa.
Ricorda! Questa operazione deve essere eseguita lato client. Riscrivere le richieste API lato server equivale sostanzialmente a restituire una risposta 403 e reindirizzerà le chiamate API, non il browser dell'utente.
4. Note finali
Sebbene speriamo che gli esempi forniti siano chiari e utili, comprendiamo che a volte possa essere necessario rivolgersi a uno specialista per ricevere consigli e chiarimenti. I nostri esperti di integrazione sono disponibili all'indirizzo support@crowdhandler.com e pronti ad assistervi in caso di necessità.